
The Foundation of a Thriving Bonsai: Understanding Soil
For years, I’ve preached the importance of soil, and I’ll keep doing it. It’s the silent partner in our bonsai journey, often overlooked, yet absolutely crucial for success. You can have the most aesthetically pleasing tree, spend hours wiring and pruning, but if the soil isn’t right, your bonsai simply won’t thrive. Think of it as the foundation of a house – a weak foundation will eventually lead to cracks and collapse, no matter how beautiful the structure above.
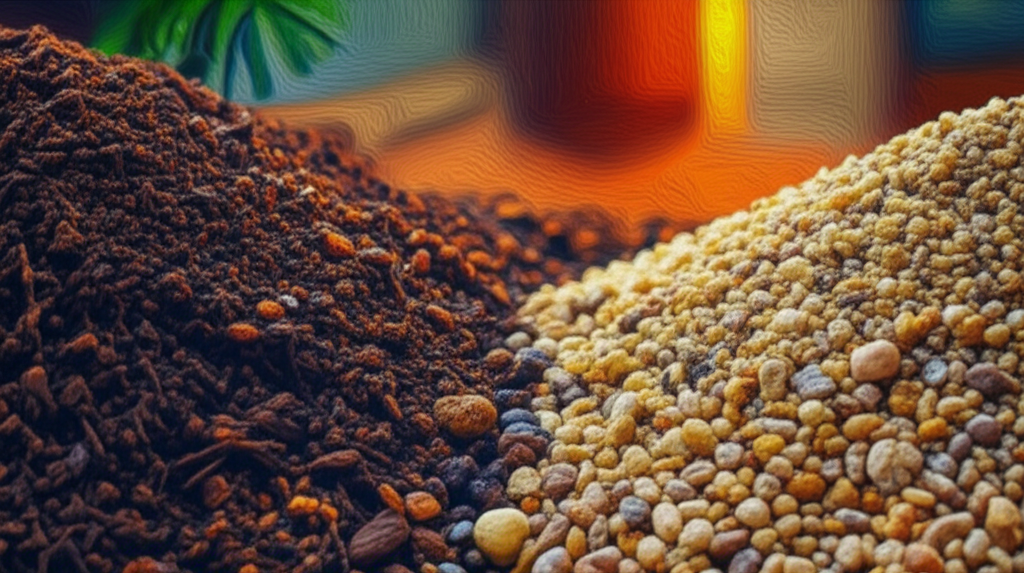
Too many beginners, myself included back when I started, assume any old potting mix will do. I remember using standard garden soil for my first juniper. It was a disaster! The soil compacted, drainage was terrible, and the roots suffocated. The poor thing limped along for a few months before finally succumbing. That experience was a harsh, but valuable, lesson. Bonsai soil needs to be drastically different from what you’d use in a typical garden pot.
Why Bonsai Soil is Different
The primary difference lies in drainage and aeration. Bonsai pots are shallow, which means less room for root growth and increased risk of waterlogging. Standard potting soil retains too much water, leading to root rot, a common killer of bonsai. Bonsai soil, on the other hand, needs to drain quickly while still retaining enough moisture to keep the tree hydrated. It also needs to provide adequate aeration, allowing the roots to breathe. Imagine trying to breathe with a pillow over your face – that’s what it’s like for roots in compacted soil!
Therefore, bonsai soil is typically a mix of coarse, inorganic materials that create air pockets and facilitate drainage. These materials also resist compaction, ensuring long-term health for your tree.
Common Components of Bonsai Soil
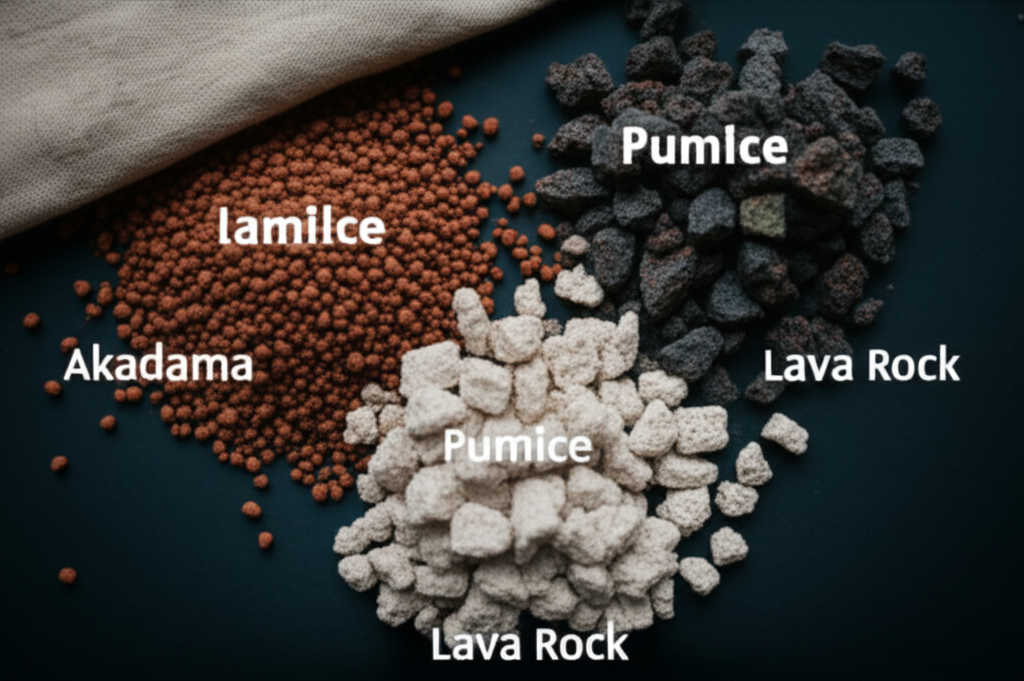
There are three main ingredients you’ll find in most bonsai soil mixes:
- Akadama: This is a hard, granular clay that’s baked to improve drainage and aeration. It retains some moisture and nutrients but doesn’t become waterlogged. I consider it the backbone of my bonsai soil mixes.
- Pumice: A lightweight volcanic rock that provides excellent drainage and aeration. It also helps to retain some moisture. Pumice is great for promoting healthy root growth.
- Lava Rock: Another volcanic rock, but denser than pumice. Lava rock improves drainage and aeration and adds weight to the soil, which is important for stability, especially for larger bonsai.
The ratios of these components will vary depending on the type of tree you’re growing and your local climate. For example, a pine tree, which prefers drier conditions, will benefit from a higher proportion of pumice and lava rock. A maple tree, which needs more moisture, might require a higher percentage of akadama.
I often experiment with different ratios to find what works best for each of my trees. Don’t be afraid to do the same! Keep detailed notes of your mixes and the tree’s response. It’s all part of the learning process.
The Art of Repotting: A Necessary Ritual
Repotting is another essential aspect of bonsai care. It’s not just about giving the tree a bigger pot; it’s about refreshing the soil, pruning the roots, and ensuring the tree’s long-term health. Think of it as a spring cleaning for your bonsai’s root system. Over time, the soil breaks down, becomes compacted, and loses its ability to drain properly. The roots become pot-bound, circling the inside of the pot and restricting nutrient uptake. Repotting addresses these issues, revitalizing the tree and promoting new growth.
I remember the first time I repotted a bonsai. I was terrified! I was convinced I was going to kill it. But I followed the instructions carefully, and to my surprise, the tree not only survived but thrived. It was a rewarding experience that gave me the confidence to tackle more complex repotting projects.
When to Repot
The timing of repotting depends on the species of tree and its age. Young, rapidly growing trees typically need to be repotted every year or two. Older, more established trees can go longer, perhaps every three to five years. The best time to repot is usually in early spring, just before the tree begins to actively grow. This allows the tree to recover quickly and establish new roots before the heat of summer.
There are also visual cues that indicate it’s time to repot. If you notice the soil is drying out very quickly, even after watering, or if the roots are emerging from the drainage holes, it’s a sign that the tree is pot-bound and needs to be repotted. Another telltale sign is a general decline in the tree’s health, such as yellowing leaves or stunted growth.
The Repotting Process: A Step-by-Step Guide
Repotting can seem daunting, but it’s actually quite straightforward. Here’s a step-by-step guide:
- Prepare your tools and materials: You’ll need a bonsai pot, bonsai soil mix, a root hook or chopstick, root cutters, and wire for securing the tree in the new pot.
- Remove the tree from the old pot: Gently loosen the soil around the edges of the pot with a root hook or chopstick. Then, carefully lift the tree out of the pot. If the roots are tightly bound, you may need to use a root cutter to sever some of the larger roots.
- Prune the roots: This is the most important part of the repotting process. Use root cutters to remove any dead, diseased, or circling roots. Aim to reduce the root ball by about one-third. This will encourage new root growth and improve nutrient uptake.
- Prepare the new pot: Place a mesh screen over the drainage holes to prevent soil from washing out. Then, add a layer of bonsai soil mix to the bottom of the pot.
- Position the tree in the new pot: Place the tree in the pot and add more bonsai soil mix around the roots. Use a chopstick to work the soil into the root ball and eliminate any air pockets.
- Secure the tree in the pot: Use wire to secure the tree to the pot through the drainage holes. This will prevent the tree from shifting and allow the roots to establish themselves.
- Water thoroughly: Water the tree thoroughly after repotting to settle the soil and hydrate the roots.
After repotting, it’s important to protect the tree from direct sunlight and wind for a few weeks. This will give the tree time to recover and establish new roots. I usually keep my repotted trees in a shaded area and mist them regularly to keep the foliage hydrated.

Advanced Techniques: Tailoring Soil and Repotting to Specific Species
While the basic principles of soil and repotting apply to all bonsai, there are some advanced techniques that can be used to tailor these practices to specific species. This is where the art truly meets the science. Understanding the unique needs of each species is crucial for optimizing its health and vitality.
Deciduous Trees
Deciduous trees, such as maples and elms, generally prefer a soil mix that retains more moisture. A higher proportion of akadama in the mix is often beneficial. When repotting deciduous trees, it’s important to be particularly careful not to damage the delicate roots. I often use a root hook to gently tease apart the root ball and remove any circling roots. Deciduous trees also benefit from a slightly more aggressive root pruning, as this encourages branching and ramification.
Coniferous Trees
Coniferous trees, such as pines and junipers, prefer a well-draining soil mix. A higher proportion of pumice and lava rock is ideal. Coniferous trees are also more susceptible to root rot, so it’s important to avoid overwatering. When repotting coniferous trees, I’m careful to maintain the mycorrhizal fungi that live in symbiosis with the roots. These fungi help the tree absorb nutrients and water. I often sprinkle a small amount of the old soil into the new pot to introduce these beneficial fungi.
Azaleas and Other Acid-Loving Trees
Azaleas and other acid-loving trees require a special soil mix that is acidic and well-draining. A mixture of akadama, pumice, and peat moss is often used. When repotting azaleas, it’s important to avoid damaging the fine, hair-like roots. I often use a gentle stream of water to wash away the old soil and expose the roots. Azaleas also benefit from the addition of an acidifying fertilizer after repotting.
I have a beautiful Satsuki azalea that I’ve been training for over 20 years. It’s a real showstopper! I’ve learned over the years that the key to keeping it healthy is to use the right soil mix and to repot it regularly, usually every two years. I also make sure to protect it from the hot afternoon sun, as azaleas are sensitive to excessive heat.
Troubleshooting Common Soil and Repotting Problems
Even with the best intentions, problems can sometimes arise with soil and repotting. Here are some common issues and how to address them:
Root Rot
Root rot is a fungal disease that occurs when the roots are constantly wet. Symptoms include yellowing leaves, stunted growth, and a foul odor coming from the soil. To treat root rot, remove the tree from the pot and carefully prune away any affected roots. Repot the tree in fresh, well-draining soil. Avoid overwatering and ensure the pot has adequate drainage.
Soil Compaction
Soil compaction occurs when the soil particles are pressed together, reducing aeration and drainage. Symptoms include slow growth and difficulty watering. To address soil compaction, repot the tree in fresh, well-draining soil. Use a root hook or chopstick to loosen the soil around the roots. Amend the soil mix with more pumice or lava rock to improve drainage.
Nutrient Deficiencies
Nutrient deficiencies can occur when the soil is depleted of essential nutrients. Symptoms vary depending on the specific nutrient deficiency, but can include yellowing leaves, stunted growth, and poor flowering. To address nutrient deficiencies, fertilize the tree regularly with a balanced fertilizer. You can also amend the soil with organic matter, such as compost or well-rotted manure.
Pest and Disease Problems
Soil can also harbor pests and diseases that can harm your bonsai. To prevent pest and disease problems, use sterilized soil and clean your tools regularly. Inspect your trees regularly for signs of pests and diseases, and take action promptly if you find any problems. There are many organic and chemical treatments available for controlling pests and diseases on bonsai.
I once had a terrible aphid infestation on my Japanese maple. They were all over the leaves and stems, sucking the sap and weakening the tree. I tried several different organic treatments, but nothing seemed to work. Finally, I resorted to a chemical insecticide, which quickly eradicated the aphids. I was hesitant to use chemicals, but I felt it was necessary to save the tree. Since then, I’ve been much more diligent about inspecting my trees regularly and taking action at the first sign of trouble.

The Long Game: Patience and Observation
Ultimately, mastering soil and repotting techniques is a journey, not a destination. It requires patience, observation, and a willingness to learn from your mistakes. Don’t be afraid to experiment with different soil mixes and repotting techniques to find what works best for your trees and your growing environment. Keep detailed records of your experiments and observations. The more you learn about your trees and their needs, the better you’ll be able to care for them. It’s taken me years to get where I am now, and I’m still learning every day. The joy of bonsai is in the constant evolution, the constant refinement of your skills, and the deep connection you develop with these living works of art. Embrace the process, and enjoy the journey.
My name is Christopher Brown, I am 38 years old and I live in the United States. I am deeply passionate about the art of bonsai and have been cultivating trees for several years. What started as a simple curiosity turned into a daily practice and an important part of my life.
On this blog, I share my real experiences with bonsai — including what works, what doesn’t, and the lessons I learn along the way. I enjoy experimenting with techniques, observing the growth of each tree, and documenting the process with honesty and patience.
My goal with InfoWeHub is to help beginners feel more confident, avoid common mistakes, and discover the beauty of bonsai cultivation. If you are starting your journey or already love this art, you are welcome here.